Kia Stinger: Engine Control System / Electric Waste Gate Actuator (EWGA)
Description and operation
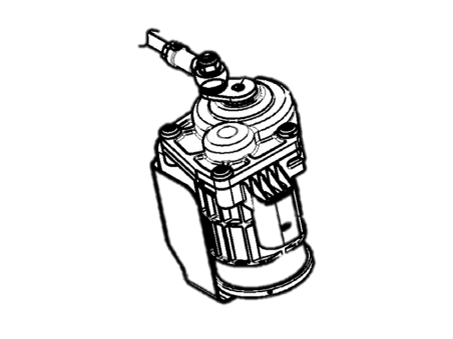
Installed on the turbocharger, the Electric Waste Gate Actuator (EWGA) operates
the vane in the Waste Gate Turbocharger (WGT) and regulates the compressed air amount
based on the PWM signal from the ECM. This actuator consists of a DC motor which
actuates the vane, a 2-step gear which increases torque of the DC motor, a position
sensor which detects status of the vane, and an electric control unit which drives
the DC motor.
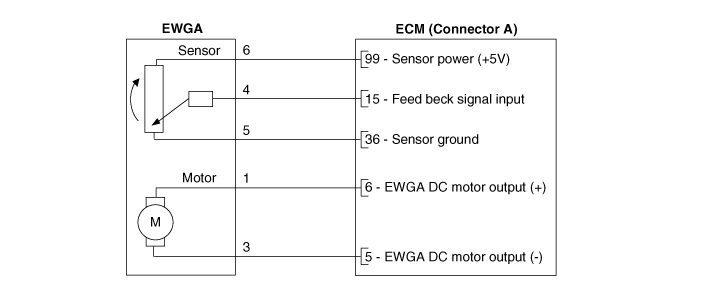
Schematic diagrams
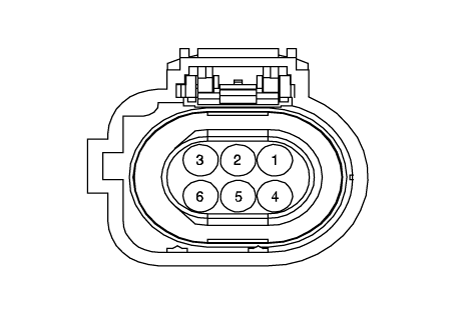
Harness Connector
Repair procedures
|
Electric Waste Gate Actuator (EWGA) cannot be replaced on its own; it
should be replaced with the Turbo Charger.
(Refer to Engine Mechanical System - Turbo Charger")
|
|
Electric Waste Gate Actuator (EWGA) cannot be replaced on its own; it
should be replaced with the Turbo Charger.
(Refer to Engine Mechanical System - Turbo Charger")
|
[Rod Adjustment Procedure
Flowchart]
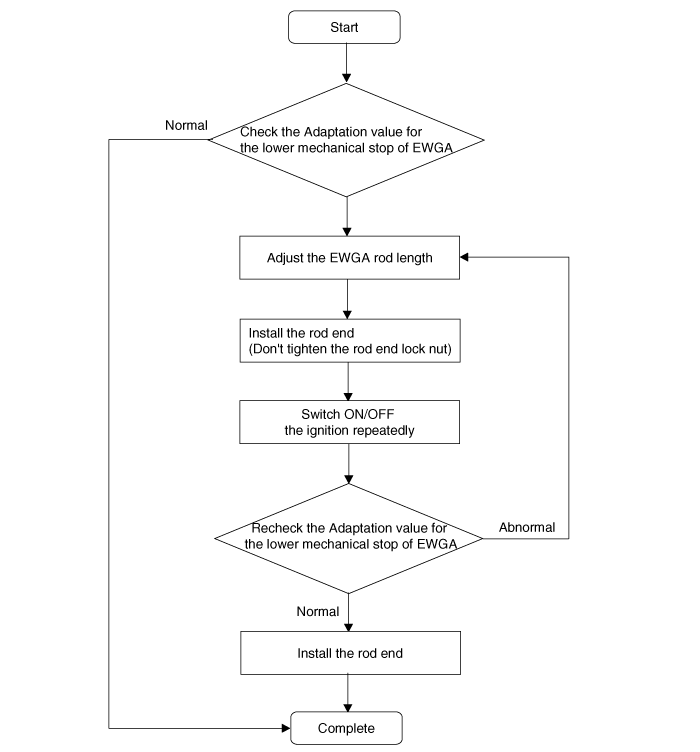
| 1. |
Check that the waste gate turbocharger is cool enough to work on.
|
Use an electric fan to help cool down fast.
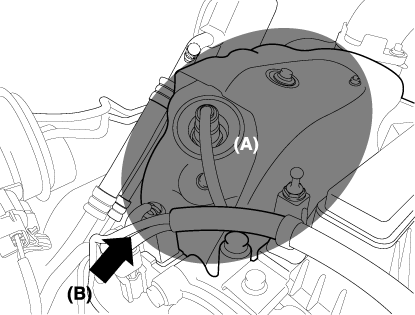
The area to be cooled (A) and the wind direction (B) are as shown
below.
|
|
| 2. |
Switch "OFF" the ignition.
|
| 3. |
Connect the diagnostic tool to DLC connector (16 pin) under the driver
side instrument panel.
|
| 4. |
Switch "ON" the ignition.
|
| 5. |
Select VIN or Vehicle on the initial screen.
|
| 6. |
Enter "Engine Control" menu after selecting vehicle information (Vehicle
model, Model year, Engine type) or entering the VIN number.
|
| 7. |
Access to KDS Engine > Current Data.
|
| 8. |
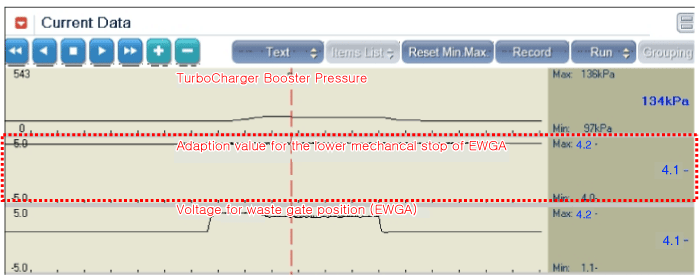
Without starting the engine, cycle the ignition "ON" for 5 seconds then
"OFF" for 5 seconds to check the "Adaptation value for the low mechanical
stop of EWGA" on the KDS.
Repeat this step until the change in adaptation value from previous cycle
is below 0.05 V.
|
Do not start the engine. This is a crucial step to read the correct
adaptation value.
|
|
| 9. |
Check that the "Adaptation value for the lower mechancal stop of EWGA"
is within the specified voltage range.
Coolant temperature (°C)
|
Specified voltage range (V)
|
41 - 60
|
3.8 - 4.0
|
26 - 40
|
3.85 -4.05
|
Below 25
|
3.9 - 4.1
|
|
| 10. |
If the measured voltage is not within the specified voltage range, adjust
the EWGA rod length.Otherwise, no further procedure is required.
| (1) |
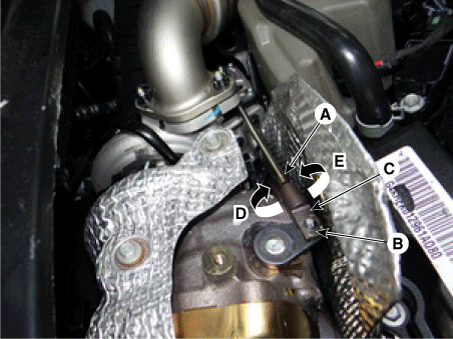
Loosen the rod end lock nut (A) and remove the C-ring (B).
|
| (2) |
Adjust the rod end (C) by rotating it clockwise (D) or counterclockwise
(E) to satisfy the specification.
For example, if the coolant temperature is below 25 °C, adjust
as follows.
Adaptation value for the lower mechancal stop of EWGA (V)
|
Adjustment direction of rod end
|
Rod length variation (After adjustment)
|
> 4.1
|
clockwise
|
Shorter
|
< 3.9
|
counterclockwise
|
Longer
|
|
Turning angle
|
Changing level of the adaptation value (V)
|
0.5 turn (180°)
|
0.15
- 0.20
|
1 turn (360°)
|
0.30
- 0.40
|
|
|
|
| 11. |
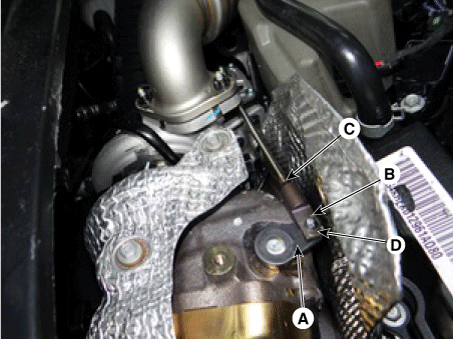
Install the rod end (B) to the turbocharger lever (A) temporarily. Don't
tighten the rod end lock nut (C) and C-ring (D).
|
| 12. |
Check " Adaptation value for the lower mechancal stop of EWGA" after
selecting "Current Data" menu.
Switch ON/OFF the ignition repeatedly until the change in "Adaptation
value for the lower mechanical stop of EWGA" is within 0.05 V.
|
Switch ON/OFF the ignition pausing for 5 seconds in each ignition
status.
|

|
| 13. |
If the measured voltage is not within the specified voltage range, repeat
procedures 9-11 until the voltage is within the specified voltage range.
|
| 14. |
Check that the "Adaptation value for the lower mechancal stop of EWGA"
is within the specified voltage range.
|
| 15. |
If it is within the specified voltage range, install the rod end to the
turbocharger lever.
| (1) |
Install the rod end (B) to the turbocharger lever (A).
|
| (2) |
Tighten the rod end lock nut (C).
|
| (3) |
Install the C-ring (E).
|
| •
|
Be careful not to remove the washer (D).
|
|

|
Troubleshooting
Specifications
Specification
Item
Specification
Coil Resistance (Ω)
28.3 - 31.1 [20°C(68°F)]
Description and opera ...
Components and components location
Components Location
1. Battery
sensor
2. Brake Booster Vacuum Pressure Sensor (BBVPS)
3. AGM battery
4. DC/DC Converte ...
Other information:
Components and components location
Components
Repair procedures
Removal
1.
Disconnect the negative (-) battery terminal.
2.
Remove the crash pad passenger side panal.
(Refer to Body - "Crash Pad Center Panel")
...
Your vehicle may be equipped with the ISG system, which reduces fuel consumption
by automatically shutting down the engine, when the vehicle is at a standstill.
(For example : red light, stop sign and traffic jam)
The engine starts automatically as soon as the starting conditions are met.
The ...


 RCV Control Solenoid Valve
 ISG (Idle Stop & Go) System


