Kia Stinger CK: Engine Mechanical System / Timing System
Kia Stinger (CK) 2018-2023 Service Manual / Engine Mechanical System / Timing System
Contents:
Components and components location
| Components |
|
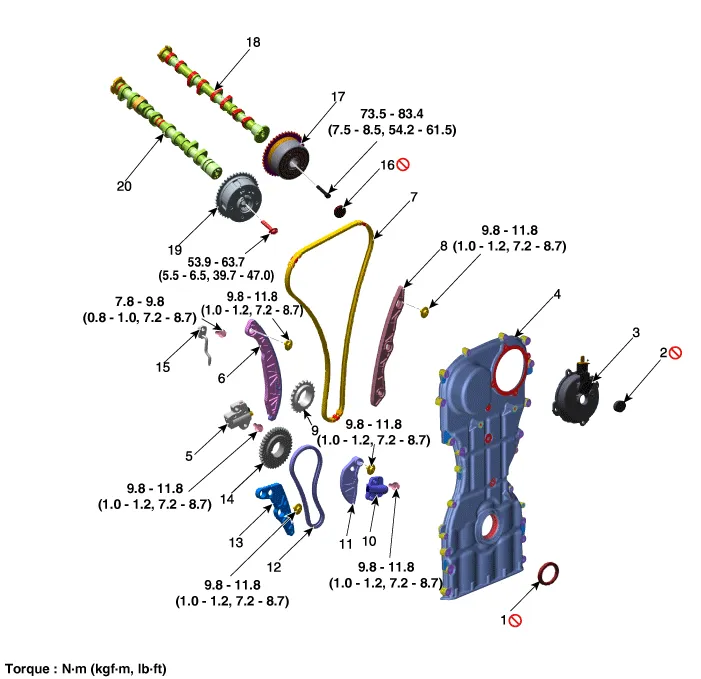
1. Front oil seal 2. E-CVVT cover plug 3. E-CVVT assembly cover 4. Timing chain cover 5. Timing chain tensioner 6. Timing chain tensioner arm 7. Timing chain |
8. Timing chain guide 9. Timing chain sprocket 10. Balance shaft chain tensioner 11. Balance shaft chain tensioner arm 12. Balance shaft chain 13. Balance shaft chain guide 14. Balance shaft chain sprocket |
15. Timing chain oil jet 16. E-CVVT plug 17. Intake E-CVVT assembly 18. Intake camshaft 19. Exhaust CVVT assembly 20. Exhaust camshaft |
Front Oil Seal ➤
Timing Chain Cover ➤
Timing Chain ➤


Other information:
Kia Stinger (CK) 2018-2023 Service Manual: ISG (Idle Stop and Go) system
Your vehicle may be equipped with the ISG system, which reduces fuel consumption by automatically shutting down the engine, when the vehicle is at a standstill. (For example : red light, stop sign and traffic jam) The engine starts automatically as soon as the starting conditions are met. The ISG system is ON whenever the engine is running. ✽ NOTICE When the engine automatically starts by the ISG system, some warning lights (ABS, ESC, ESC OFF, EPS or Parking brake warning light) may turn on for a few seconds.Kia Stinger (CK) 2018-2023 Service Manual: Rear Suspension System
Components and components location Components Location 1. Rear upper arm rear 2. Rear upper arm front 3. Rear cross member 4. Rear differential 5. Rear stabilizer bar 6. Rear shock absorber 7. Rear axle 8. Rear assist arm 9. Rear lower armCategories
- Manuals Home
- Kia Stinger Owners Manual
- Kia Stinger Service Manual
- New on site
- Most important about car
Contents

Copyright © 2026 www.kstinger.com 0.0082