Kia Stinger CK: Intake And Exhaust System / Intake Manifold
Components and components location
| Components |
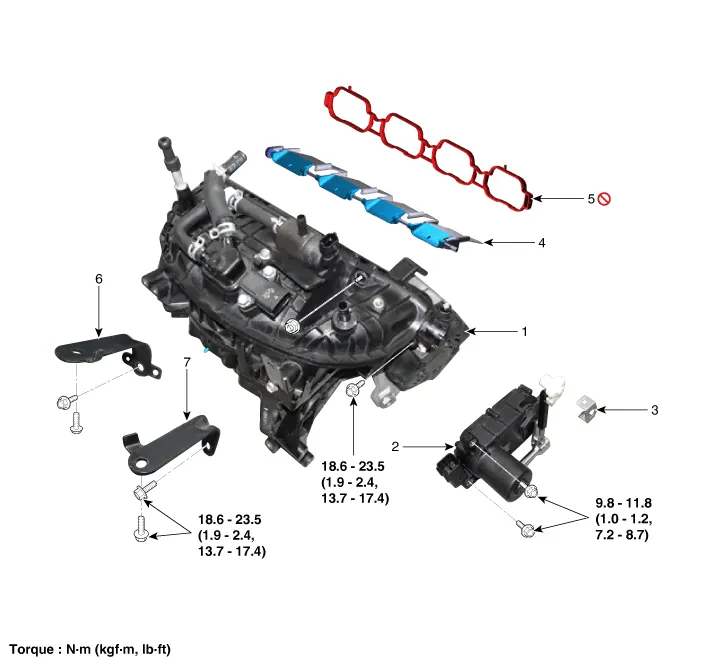
| 1. Intake manifold 2. VCM actuator 3. Clip 4. VCM shaft |
5. Intake manifold gasket 6. Intake manifold bracket (LH) 7. Intake manifold bracket (RH) |
Repair procedures
| Removal and Installation |
| 1. |
Disconnect the negative battery terminal. |
| 2. |
Remove the engine room front under cover. (Refer to Engine and Transmission Assembly - "Engine Room Under Cover") |
| 3. |
Drain the coolant. (Refer to Cooling System - "Coolant") |
| 4. |
Remove the engine cover. (Refer to Engine and Transmission Assembly - "Engine Cover") |
| 5. |
Disconnect the wiring connectors and harness clamps and remove the connector brackets around the intake manifold.
|


| 6. |
Disconnect the radiator upper hose (A) and water hose (B).
|

| 7. |
Remove the water outlet pipe assembly (A).
|

| 8. |
Remove the intercooler outlet hose & pipe assembly (A).
|

| 9. |
Disconnect the positive crankcase ventilation (PCV) hose (A).
|

| 10. |
Disconnect the purge control solenoid valve (PCSV) hose (A).
|

| 11. |
Disconnect the vacuum hose (A).
|

| 12. |
Remove the alternator. (Refer to Engine Electrical System - "Alternator") |
| 13. |
Unfasten the electric throttle body control (ETC) module bolts. (Refer to Engine Control / Fuel System - "Electric Throttle Body Control System (ETC)") |
| 14. |
Remove the oil level pipe. (Refer to Lubrication System - "Oil Level Gauge & Pipe") |
| 15. |
Remove the intake manifold stay (A).
|

| 16. |
Remove the intake manifold stay bolt (A).
|

| 17. |
Disconnect the vacuum hose (A).
|

| 18. |
Remove the intake manifold (A).
|

| 19. |
Remove the intake manifold stay (A).
|

| 20. |
Install in the reverse order of removal.
|


Other information:
Kia Stinger (CK) 2018-2023 Service Manual: Air Conditioning System
General safety information and caution When Handling Refrigerant 1. R-134a liquid refrigerant is highly volatile. A drop on the skin of your hand could result in localized frostbite. When handling the refrigerant, be sure to wear gloves. 2. It is standard practice to wear goggles or glasses to protect your eyes, and gloves to protect your hands.Kia Stinger (CK) 2018-2023 Service Manual: Good driving practices
Never move the shift lever from P (Park) or N (Neutral) to any other position with the accelerator pedal depressed. Never move the shift lever into P (Park) when the vehicle is in motion. Be sure the vehicle is completely stopped before you attempt to shift into R (Reverse) or D (Drive). Do not move the shift lever to N (Neutral) when driving.Categories
- Manuals Home
- Kia Stinger Owners Manual
- Kia Stinger Service Manual
- New on site
- Most important about car
